This is a fun idea for a snack on game day. It is steak and mashed potatoes wrapped in a spring roll and served with a gravy dipping sauce. I pan fried them in olive oil so I didn’t need to get out the deep fryer and the good olive oil just adds to the rich little snack.

You will need:

  • 2 baking potatoes – like a russet
  • 1/2 cup milk (any kind)
  • 2 tbsp olive oil – I always use extra virgin
  • 2 tbsp butter
  • salt and pepper to taste
  • 1 steak – I used a filet mignon/beef tenderloin
  • 2 cloves garlic – chopped
  • 1 tsp Italian seasoning mix with a bit of chili flakes
  • 1/4 tsp fresh ground pepper
  • 2 tbsp olive oil
  • won ton wrappers
Gravy Dip
  • 1 cup chopped mushrooms – any kind
  • 1 small onion – diced fine
  • 2 tbsp olive oil
  • 2 cloves garlic
  • 2 tbsp flour
  • water or beef broth to thin out
  • salt and pepper to taste

  Step 1: make your mashed potatoes. Wash and peel potatoes. Chop into large chunks.     Step 2: Place in salted water and boil until a knife inserted indicates the potatoes are soft and cooked through. This takes approx 20-30 minutes on medium heat. (depending on the size of your chunks, smaller pieces cook faster)     Step 3: drain potatoes and place back into the hot pot. Add milk, olive oil and butter and mash. Add salt and pepper and taste to ensure seasoned properly. You want the potatoes mashed but not thin and wet. Once they cool they will firm up slightly. Set aside to cool.     Step 4: place steak in a small bowl. Add chopped garlic, Italian seasoning, ground pepper and olive oil. Rub and let sit until meat comes to room temperature. I do not add salt here I wait until just before cooking it.     Step 5:  add a good sprinkle of salt and add meat and olive oil to a hot pan. Cook briefly. A few minutes on each side. You don’t want to overcook the steak since it is a very tender cut and also because you will be cooking it a bit more once it is in the wrapper. I cook mine to a medium-rare. Remove from pan and let sit for 5-10 minutes before slicing.     Step 6: chop mushrooms, onions and garlic.     Step 7: in the same pan (do not wash it!) place onions and olive oil and cook for 10 minutes on medium heat, scraping all the browned bits from the steak into the onions. Add mushrooms and garlic and cook another 10 minutes. You want to cook out most of the water from the mushrooms and they will just start to brown. Add the flour and stir into the mushrooms. Cook 30 seconds and add 1/2 cup of beef broth or water. Stir well. The broth with thicken with the flour and you can continue to add a bit more broth until the gravy is the consistency you prefer in a gravy.       
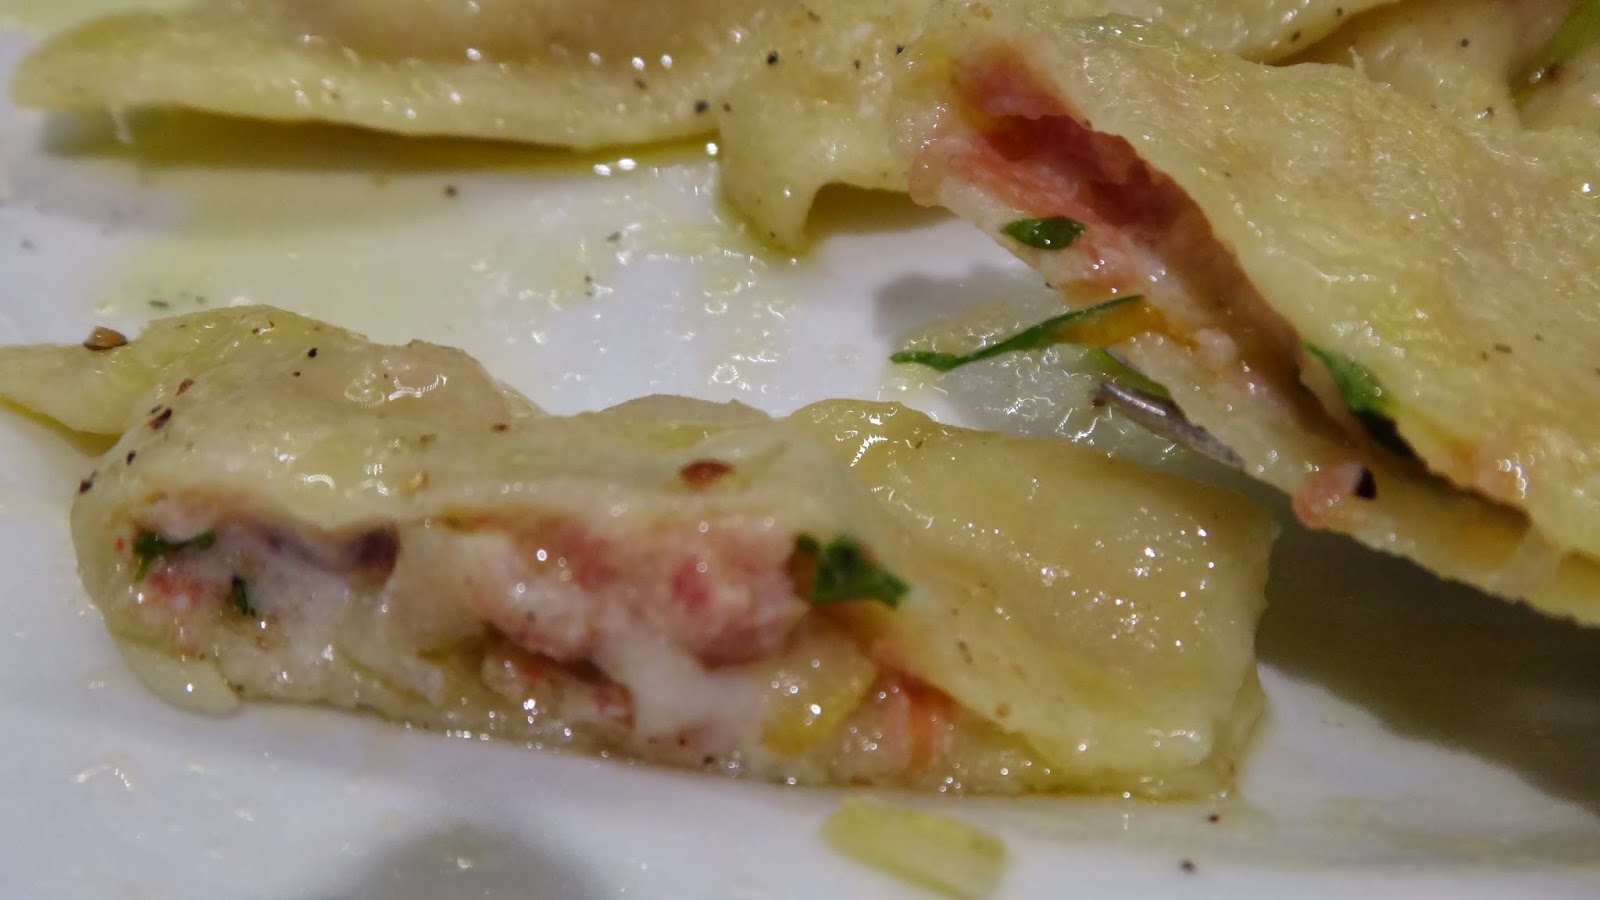
Step 8: slice cooled steak. Separate the won ton wrappers (I work with 4 at a time to avoid drying out) Add a slice of beef and a heaped teaspoon of mashed potato, salt and pepper. Dip your finger in water and wet edges of wrapper. Fold in sides and wrap, making sure water seals edges. Repeat until you are done. You can use mashed potatoes and asparagus or ham or whatever you like.     
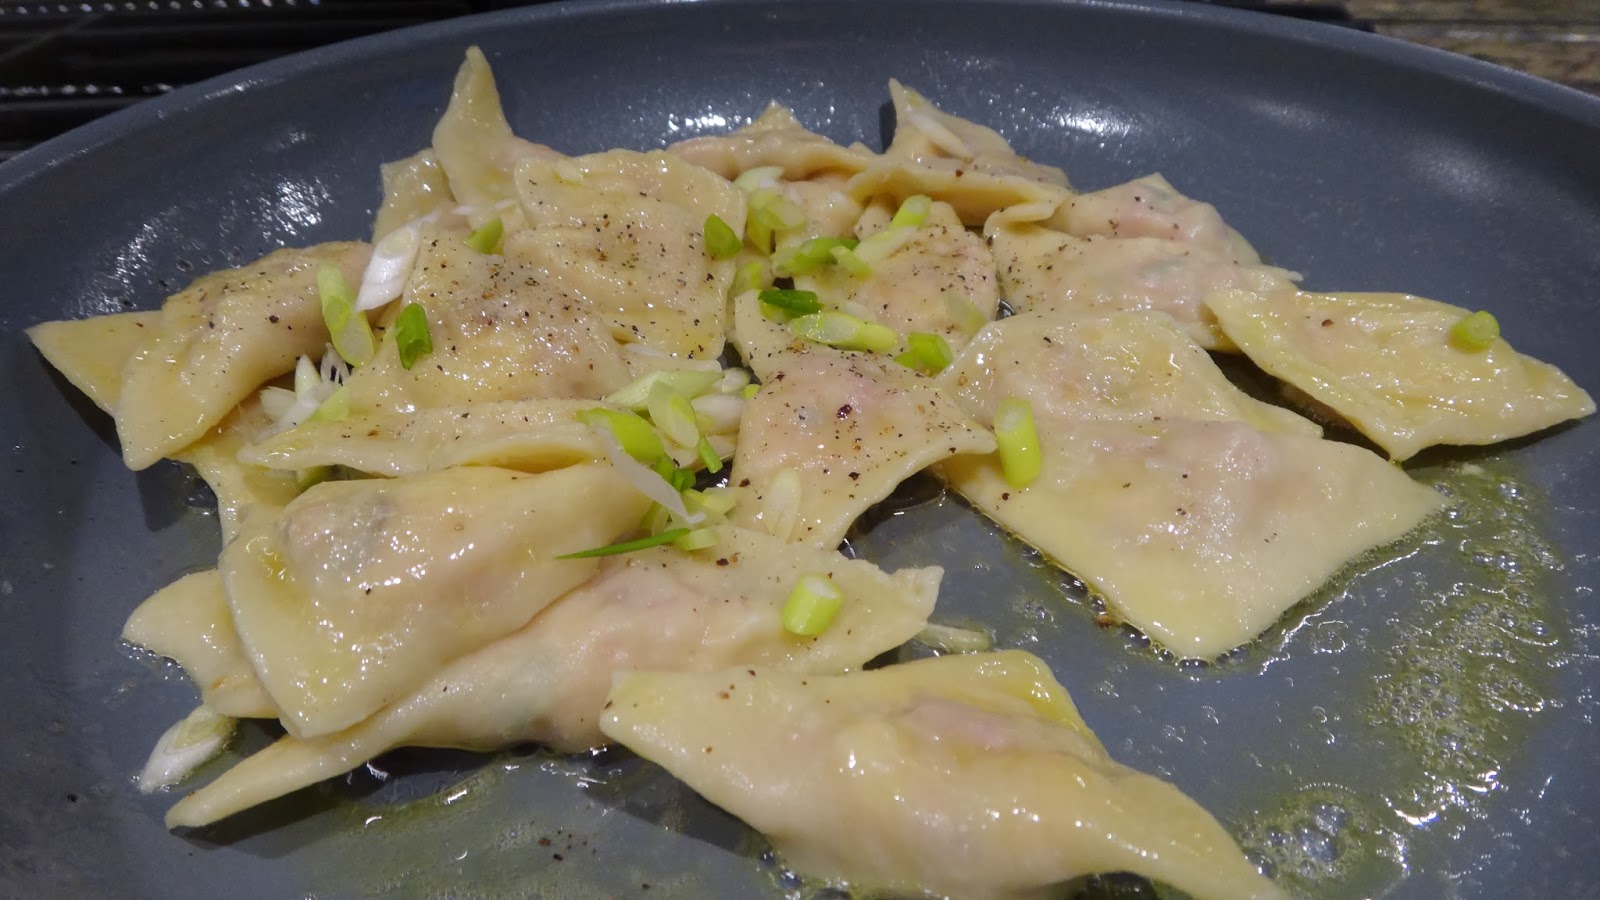
Step 9: in a large pan shallow fry the spring rolls in olive oil until browned  on all sides. Place on paper towel and sprinkle with salt and pepper right away. You can deep fry if you prefer. I like this method because it is easier, cleaner and I use better quality oil.     what is not to love?!! steak and mashed potatoes dipped in gravy!

Chocolate Ferrero Rocher Cream Tart


This is a very simple but decadent pie that is sure to impress! I have chopped some Ferrero Rocher chocolates and made a layer at the bottom of the pie with these milk chocolates.The crunchy contrast, along with the dark filling and the soft whipped cream made a perfect end to a fabulous meal.

Big Pete has already asked me to make again!


You will need:


  • 1 heaped cup of graham cracker crumbs
  • 4 tbsp of melted butter
  • 2 tbsp sugar (or vanilla sugar)
  • 4-6 chopped Ferrero Rocher chocolates – place in fridge to harden and then chop
  • 8 oz/226 grams of chopped bittersweet chocolate
  • 2 oz/62 grams of semi sweet chocolate (which is 6 squares of Lindt chocolate)
  • 3 tbsp unsalted butter
  • 1 cup whipping cream
  • 3 tbsp sugar
  • 1/4 tsp salt
  • 1 tsp vanilla

Topping

1 cup whipping cream

2 tbsp vanilla sugar

1 tbsp vanilla or rum

grated chocolate to top


Step 1: in a small bowl add graham cracker crumbs, melted butter and sugar. Combine with your fingers and press into a tart pan with removable bottom. My pan is 9 1/2 inches. I use my hands to spread evenly then I used a measuring cup to press in the bottom and sides for an even crust.


Bake in a 350 degree F oven for 8-10 minutes. Remove and let cool.


Step 2: gather all your ingredients. Since this is a chocolate tart the better the quality of chocolate the better your end result.


Step 3: weigh and chop your bittersweet and semi-sweet chocolate. Place the bittersweet and semi-sweet chocolate, butter and vanilla in a small bowl. Chop and leave the Ferrero Rocher until the crust has cooled.


Step 4: in a small pot add vanilla sugar (or regular sugar) and cream. I make my own vanilla sugar by slicing vanilla pods in half and adding to a container of sugar. Just keep adding sugar and vanilla as you use it up. I heat the cream until it just starts to come to the boil (approx 5 minutes…watch it or it can easily boil over!) As soon as it comes to a boil remove from heat.


Step 5: pour the cream over the chocolate, butter and vanilla and let sit for 4 minutes. Then gently stir until smooth and glossy. Let cool.


Step 6: place chopped Ferrero Rocher pieces evenly over cooled crust. You can add more of you like a bit more.


Step 7: pour cooled chocolate in crust. You can leave this on the counter to harden for a few hours or you can place in fridge to speed up the process.


Step 8: just before serving make whipped cream.Add cream, sugar and vanilla or rum to a large bowl. You can also add a tbsp of powdered milk to stabilize the cream if you are going to have some left over for the next day or two. Whip until you just get stiff peaks.


Spoon and spread the cream over the tart and grate a bit more chocolate to top. Dip a large knife in hot water and dry with each slice to make perfect slices (clearly this did not happen when this slice was cut…I am just saying!)


Enjoy!!! you know you will want more than one slice.


Pear, Ham and Cheese Ravioli


Next time you have some leftover ham make a batch of ham and cheese ravioli. The pasta is really not difficult to make fresh and you can make a ton and freeze some for a later date. I have actually made these from a ham hock that I slowly cooked and mixed with grated pear, ricotta, mascarpone and Swiss cheeses. I cooked the ravioli and just tossed in some great extra virgin olive oil and some spring onions. Simple but dynamite!


You will need:

Pasta


  • 3 cups flour
  • 4 eggs
  • 1/2 tsp salt
  • 2 tbsp olive oil
  • 1-2 tbsp water only if necessary


Filling


  • 2 cups chopped cooked ham
  • 1/3 cup mascarpone cheese
  • 1/3 cup chopped Swiss cheese
  • 3 heaped tbsp ricotta cheese
  • 1 tbsp finely chopped parsley
  • salt and pepper to taste
  • 1 small pear – grated


  • 1 tbsp butter and 2 tbsp olive oil to saute
  • chopped spring onions/scallions
  • salt and pepper
  • optional: shaved Parmesano Reggiano


I used a ham hock which I cooked for ages however, you can simply use some chopped ham if you prefer or are pressed for time. I took the ham hock and cooked it slowly in a large pot of water. The water just covered the ham and I included a few bay leaves, 2 chopped carrots, a few cloves and a few peppercorns. I cooked the ham hock (knuckle) for 3 hours on low and then let it cool. I removed the skin and any fat.


At this stage in a food processor I pureed: 3 cloves garlic, 1 onion, 2 green onions, a handful of parsley, some fresh thyme, a fresh red chili, 2 bay leaves, 1/2 tsp of each – salt and pepper, 1/4 cup fresh chopped pineapple and 1 tsp jerk seasoning. I covered the ham with my puree and roasted in a 375 degree F oven for 2 hours more.


Finally, I took the ham hock and all its juices and covered it about halfway up the hock with water and once again let it slowly cook on the stove covered and on low heat for another 2 hours until it was falling off the bone. This is a tough piece of meat but, if you cook it slowly it will get as tender and actually more delicious than some hams you can buy.


Hey!!! I get it, most people can’t be bothered because this just takes too long that is why I have also suggested you can use good quality ham and still get a great product. I am just sharing another way.


Step 1: make your pasta. I use a food processor for great results. Place all ingredients except water in processor and mix for 10-15 seconds. If it doesn’t start to form a ball it will need the additional water. Re-start the machine and let it run for approximately 30 seconds and it should form a ball and almost stop the machine. Take out dough and with a bit of additional flour knead a few times on the counter. You should have a lovely soft dough. Cover with plastic wrap and let rest 30 minutes before rolling out.


Step 2: Make your filling. Take your chopped ham (buy the best quality ham you can find for optimum flavour and texture – you can even use good quality sliced deli hams here), mascarpone cheese, Swiss cheese, ricotta cheese, chopped parsley, salt and pepper and grated pear. Mix and taste it to make sure it is not bland. If you need to adjust your seasoning do it.


Step 3: cut dough into 8 equal pieces. I cut in half and then keep cutting each in half until I get 8 even pieces. Make sure you have lots of flour to avoid pasta from sticking to machine and also counter. I run through my pasta roller attachment on my kitchenaid machine until I get to about #5. I don’t want the dough too thin so the filling comes out. I work with 1 sheet at a time and keep the other pieces of dough covered with plastic wrap while I am filling the one I have. I simply cut squares and add a tsp of filling to each square, then dip my finger in water and run water along 2 edges of square, then fold and seal by pinching together. You can cut them with a cutter if you prefer this is just fast for me.


Place finished ravioli on a floured baking sheet. Repeat until finished.


If you want to freeze them at this stage place separated ravioli in freezer and let get hard for 1 hour. Once frozen remove and place in Ziploc bag. When you want to cook them take them from frozen and right into boiling water to cook.


Step 4: in salted boiling water place a few ravioli and gently stir. Once they float to the top let them cook 2 minutes more.


Step 5: remove from water with a spider or slotted spoon and place into a hot pan with butter and olive oil


Step 6: gently cook on medium heat for another minute or two on each side. Add a sprinkle of spring onions and salt and pepper to taste.


Serve with some chopped parsley and a shaving a Parmesano Reggiano.


Honey Olive Oil Buttermilk Biscuits


I must say I love the bottom of a biscuit best of all! I love the crunchy browned bottom and the fluffy warm layers that make these delicious just as is, or as a light airy sandwich. You can eat these with some runny honey or your favourite jam or as a little sandwich with a slice of salty ham and maybe some honey mustard. You can feel good that the only butter used in these was 1 tsp I used to brush the pan and tops before baking. I used extra virgin olive oil and buttermilk and they turned out just as flaky and delicious and if you made them with butter…just sayin! You might want to try them.


You will need:

  • 2 cups all purpose flour
  • 2 1/2 tsp baking powder
  • 1/4 tsp baking soda
  • 1/2 tsp salt
  • 1 cup buttermilk
  • 4 tbsp honey
  • 3 tbsp olive oil
  • 1 tsp melted honey to brush under and on top of biscuits

Heat oven to 425 degrees F.


Gather all your ingredients together.


Step 1: in a large mixing bowl add flour, baking powder, baking soda and salt. Stir with a wooden spoon to combine.


Step 2: you can create a well in the centre of the bowl and add the buttermilk, olive oil and honey (you can mix them all together in a smaller bowl to combine first and then pour into well if you prefer)


Step 3: start by stirring the mix in the centre and then begin to gather some of the flour slowly from around the edges of the bowl.


Step 4: after about 15 seconds it will start to appear as a shaggy mess. I then start to use the spoon to scrape everything from the bottom and sides of the bowl (cleaning the bowl with the ingredients) At this stage it does not appear to be a smooth dough. Pour contents out of bowl onto counter. Remove any dough from wooden spoon.


Step 5: you do not want to handle this dough very much at all. You are looking for a nice flaky biscuit so I just kind of press it all together and form a rough square shape. It is still sticky and all the flour has not been incorporated at this step. Don’t worry.


Step 6: if you have a bench scraper it is good to use it or just with your hands fold over one half of the square and then the other half. Press the dough to make it as large as it was before you folded it. Turn once and repeat. Fold over half into the centre and then the other half into the centre. Press out and most of your flour will be absorbed. You can pat it out to smooth slightly and form a 5×6 square that is 1/2 inch thick.


Step 7: the simplest way to cut out biscuits is divide with a floured knife and cut into squares. If you prefer you can use a biscuit cutter (I am just too lazy so this is easier) At this stage you can place on a sheet separated and freeze. Once frozen place individual biscuits in a Ziploc bag.


Step 8: If you want to bake then place on a piece of parchment paper and make sure to butter under and on top of the biscuit. Bake in a hot oven, 425 degrees F for 12-14 minutes.


brush tops with a bit more butter if you like and enjoy hot.


with honey and butter


plain


with jam or even sliced ham and of course gravy if that is your thing.


Pear, Walnut and Parmesan Tortellini or Ravioli


,

This is a very nice combination of pear, walnut and cheese. I serve it simply with a quick saute in a bit of butter, great extra virgin olive oil and some freshly grated Parmesan. Fresh pasta is so worth the effort and these freeze beautifully for a later date if you don’t cook them all. This is the perfect thing to prepare on a Sunday afternoon and if you have an extra pair of hands to help it makes it even better while watching football.


You will need:


Pasta


  • 3 cups flour
  • 4 eggs
  • 1/2 tsp salt
  • 2 tbsp olive oil
  • 1-2 tbsp water if necessary

Filling

  • 2 ripe pears (but not overly soft) peeled, cored and chopped fine
  • 1 tbsp olive oil – Mandranova Nocellara
  • 10 scrapes of fresh nutmeg
  • 1/2 tsp finely grated lemon zest
  • 1/2 cup mascarpone cheese
  • 1/2 cup ricotta cheese
  • 1/3 cup freshly grated Parmesan cheese
  • 1/3 cup finely chopped walnuts
  • 1 tbsp aged balsamic vinegar
  • 1 tbsp finely chopped parsley
  • salt and pepper to taste
  • 1 tbsp butter
  • 3 tbsp olive oil
  • 1 tbsp chopped parsley 
  • more grated Parmesan to serve


Step 1: start by making the pasta dough. In a food processor add flour, salt, eggs and olive oil. Process for 20 seconds to see if the mixture comes together as a ball. If not then add 1 tbsp of water and let machine run again (only add an additional 1 tbsp if the dough does not come together still). It should form a big ball and almost stop the machine when it is done. Usually the ball will form within about 1 minute of the machine running. Remove from machine and knead for a few seconds on counter, then wrap in plastic and leave on counter or fridge while you prepare filling.


Step 2: peel and halve pears. Remove cores and slice halves into thin strips. Cut strips into small dice. Cook in a small pan with a bit of olive oil, nutmeg and finely zested lemon. Cook for 5 minutes to soften pears and cook out some of the water.


Step 3: place pears in food processor and quick pulse 5 times. There still should be some form to the pears once done.


Step 4: place pears in a bowl to cool. Add walnuts and aged thick balsamic vinegar, Let cool.


Step 5: once pears are cool add mascarpone, ricotta and Parmesan cheeses, Mix well to form a smooth mixture. Add chopped parsley and some salt and pepper. Taste and adjust seasoning if necessary. Cover and place in fridge while you make pasta and allow the mix some time to firm up.


Step 6: add some flour to the counter and slice dough into half and then each half into 4 equal pieces. I run the pasta through the flat pasta roller until each sheet is still slightly thick (I go to the 5 setting on my Kitchenaid machine) so the filling stays contained.  Place the sheets on the floured counter and slice into squares. You can make them smaller or larger as you prefer. I roll 1 sheet of pasta, then fill to avoid sheets drying out. Cover unrolled dough under plastic wrap was you work with the one you are filling.


Step 7: take a small amount of filling and place on each square made from the 1 sheet of pasta you are working on. Dip your finger in some water and run water along two sides of the pasta. I prefer to hold the pasta sheet in my hand to form.  Fold over to form a triangle.


Join 2 edges of the triangle and crimp to seal. Place tortellini on a generously floured sheet avoiding touching or they may stick to each other. Continue. Once completed I like to freeze for 20 minutes on the sheet, separated before boiling or placing into freezer bags for a later date.


If you prefer you can fold over to form a square for the simplest ravioli shape.


Step 8: place semi frozen tortellini or ravioli in gently boiling water. Let them float to the top of the pot then cook 2 more minutes. Remove from the water with a slotted spoon and place directly in a hot pan with butter and olive oil. Cook another 1-2 minutes. Add a sprinkle of salt and pepper.


Serve with a sprinkle of fresh parsley and some additional freshly grated Parmesan cheese. I also make sure to drizzle any remaining olive oil over plate.


Serve immediately!


Sartu – Risotto Pie

Sartu is a risotto and meat pie most often made with ground beef, tomato sauce and cheese. I have made one with some chicken and sausage which can also be called a Timbale which means drum because of it’s shape. You can make this kind of meal with leftover risotto or start from scratch. It is hearty and packed with lots of flavour, can be made ahead and serves a crowd. I have added some eggs to help hold the looser chicken filling together when sliced. I will make another one with the traditional beef and cheese filling at a later date.

You will need:

  • 1 small onion – diced fine
  • 4 tbsp quality extra virgin olive oil
  • salt and pepper
  • 1 1/2 cups risotto rice -short grained rice like carnaroli
  • 3 cloves garlic – minced fine
  • 1/2 white wine
  • 1 litre chicken broth
  • 1/2 freshly grated Parmesano Reggiano
  • 1 cup chopped sausage of your choice can be cured or fresh
  • 1 chicken breast – chopped into cubes
  • 2 tbsp quality extra virgin olive oil
  • 2 cloves garlic – minced fine
  • 10 button mushrooms – sliced and then rough chopped
  • 1 cup chopped broccoflower – sliced then rough chopped
  • 1 tbsp butter to coat baking pan 7inch x 2 inches deep
  • 3 tbsp breadcrumbs to coat baking pan
  • 2 tbsp finely chopped parsley
  • 2 tbsp finely chopped spring/green onion
  • 1 tbsp honey mustard
  • 2 eggs with 1 tbsp milk whisked
  • 3 tbsp freshly grated Parmesano to top.
  • 2 tbsp butter cut into tiny pieces to top.

Start with some great rice and good olive oil. You are making a risotto and basically you start with short grain rice and slowly add ladles of hot broth and stir for 20 minutes until almost all the liquid is absorbed and you are left with a creamy delicious risotto.

Step 1: in a large pot add olive oil, diced onion, salt and pepper. Cook on medium heat stirring frequently for about 10 minutes. I like the onions to just start to brown around the edges and get a bit of colour.

Step 2: add chopped garlic and rice. Cook 2 minutes stirring to coat grains of rice and avoid burning.

Step 3: add white wine and scrape the pot to loosen any onion or fond (browned cooked bits!) Cook for 2 minutes or until the wine almost completely evaporates.

Step 4: at this stage you can start adding a ladle of hot chicken broth at a time to your rice, stirring to avoid sticking. You can heat the broth in a small pot on the stove or place in a large liquid measuring cup and heat in the microwave. It should be hot so that you do not stop the boiling each time you add broth to the pot.

Step 5: continue adding and stirring until all your broth is used and you have been cooking on a medium heat for 20 minutes and the rice will be cooked. When it has absorbed almost all the liquid remove from heat.

Step 6: add your grated Parmesan and stir to incorporate, The rice should be creamy and thick but not too wet. Let cool to room temperature or even cold before lining pan with rice.

Step 7: chop all remaining items and have ready. I used a cured garlic sausage but, you could easily use a fresh mild or spicy Italian sausage if you prefer.

Step 8: in a large pan add chopped chicken, sausage and garlic in great olive oil. Cook 5 minutes.

Step 9: add mushrooms and broccoflower and cook 15 minutes until most of the water has cooked out of vegetables. Remove from heat and let cool.

Step 10: butter your pan generously and then add breadcrumbs coating pan and knocking out any excess. You can use a small, tall cake pan as I have used or any dish that have high sides that can be baked.


Step 11: press 3/4 of your rice into the pan and carefully press up the side of the pan (I used my hands) leaving 1/4 to cover the filling.

Step 12: add your chopped parsley, spring onion and 1 tbsp honey mustard to filling mix. Stir and taste. Adjust extra salt and pepper or more mustard if you feel it needs it.

Step 13: add eggs whisked with a bit of milk.

Step 14: fill your mould with filling. You can press into rice gently. Top with a bit more Parmesan.

Step 15: add remaining rice and smooth over with a spatula or your hands to seal. Add a sprinkling of breadcrumbs and a few dots of butter to finish.

Bake in a 350 degree F oven for 1 hour until top is golden. Let cool at least 20 minutes or until just warm to the touch. Place a plate over top and flip over. It should come out easily if you have buttered and added a good coating of breadcrumbs.

Slice and serve warm with a delicious salad. It is also perfect the next day.

Cranberry Bread Pudding


When you have leftover brioche, challah or panettone sweet bread you can use it in a lovely bread pudding. A few ingredients and it can be left to wait overnight in your fridge and baked in the morning for a weekend or special brunch.


You will need:


  • 6-7 cups dry bread chopped into 1 inch cubes. I have used both leftover brioche and panettone
  • 1/3 cup chopped dried cranberries
  • 2-3 tbsp bourbon or Cointreau liqueur
  • 2 tbsp softened butter for pan
  • 4 eggs- whisked in a small bowl
  • 1 cup whipping/heavy cream
  • 1 cup milk (any kind)
  • 1/2 cup sugar
  • 2 tbsp melted butter
  • 1 tsp lemon zested finely
  • 1 tsp orange zested finely
  • 2 tbsp chopped chocolate (any kind you like)
  • 1/2 cup ricotta cheese
  • 1 more tbsp butter – into tiny chunks for top of bread
  • 10-15 fresh raspberries
  • 1/2 cup sliced almonds


Step 1: Gather all your ingredients. Chop bread into cubes and let dry out before using. I just leave it for a day before I make the recipe but, you can also dry it in a low oven.


Step 2: in a small bowl add chopped cranberries and liqueur. Place in microwave for 20 seconds and let sit for 10 minutes.


Step 3: In a large bowl add dry bread cubes, soaked cranberries, eggs, cream, milk, sugar, melted butter, lemon zest, orange zest, chopped chocolate and ricotta cheese. Mix well and place mix into a generously buttered pan.


Step 4: top with blobs of butter, fresh raspberries and some sliced almonds and even a sprinkling of  additional sugar. At this stage you can leave covered in the fridge overnight or a few hours before baking. You want the custard mix to soak into the dry bread before baking.


Bake in a 350 degree F oven for 30 minutes or until nicely browned as you like it.


You can serve with a classic vanilla custard or simply with a drizzle of maple syrup!! Enjoy warm with a big mug of coffee.