Fresh Salsa

 I am facinated that people buy Salsa in a jar when it tastes so much better made fresh. You can make this kind of a fresh salsa and there is also a salsa you can make with canned tomatoes when you cannot get a good fresh tomato.For this fresh salsa

You will need:

  • 2 -3 ripe tomatoes- always store on the counter
  • 1 clove garlic -crushed
  • 2 tbsp olive oil
  • 1 lime -squeezed fresh
  • 2-3 tbsp white onion- chopped finely
  • 1/2 jalapeno pepper -chopped finely
  • 2 tbsp fresh cilantro chopped finely
  • salt and pepper
Step 1: start with nice ripe tomatoes. If you can’t find any, don’t make this recipe until you can. Store your tomatoes on the counter and never put them in the fridge. You can use plum tomatoes. They are usually better because they have less water. These were pipe so I used them.
Step 2: with a sharp knife. I slice my tomatoes and then take those slices a few layers at a time and make small dice.
Step 3: you can add some salt and leave the tomatoes a few minutes, then strain off the water. Some people scoop out the seeds and the wet flesh. I prefer to strain because the salsa stays in nice pieces. Either way is fine.
Step 4: chop onions and crush garlic and add to bowl.
Step 5: chop the jalapeno (ha-la-payn-yo!)and cilantro. Add olive oil, 1/2 lime juiced, salt and pepper and taste it. If you want the second half of the lime add it.
Let sit for 10-15 minutes and serve with chips or put on fish or chicken. Eat it fresh. 
If it gets too watery strain it. I do not like this type of salsa to be kept. It is better to make a small batch fresh than to make too much. It doesn’t keep well in the fridge. Tomatoes don’t like the fridge so eat it fresh.
way better than store bought!

Beef Stew in Beer Broth and Mushrooms

It was a cold, rainy day near Vancouver and I was hankering for something comforting and warming. I made this beef stew with onions, mushrooms and sweet potatoes. In an hour and a half I had the perfect dinner for me and Big Pete.
You will need:
  • approx 1 pound of stewing beef
  • 1-2 tbsp flour
  • salt and pepper
  • 6-7 cloves garlic- chopped fine
  • 1 onion- chopped
  • 1 tbsp Italian Seasoning
  • 1 tbsp dry porcini- powder (you can make this from dried porcini mushrooms)
  • 1 can beer
  • 1 tsp chili flakes
  • 2 tbsp fresh red chili-chopped fine (my chili is medium hot add less if its hot hot!)
  • 1 tsp salt/pepper each
  • 1 tsp hot smoked paprika
  • 1 grated apple
  • 1 sweet potato (don’t call it a YAM-see the link to show how most people think a sweet potato is a yam )
  • 1 package sliced mushrooms
  • 1 tbsp butter-room temp and 1 tbsp flour mixed
  • 2 tbsp chopped parsley
This is the perfect size for 2 people with leftovers for another lunch.
I guess that technically makes it the perfect dish for 3-4 people then. Huh?
Step 1: start with a good quality stewing beef. I buy from my favourite local butcher. 
Step 2: I like to chop up the meat into small chunks. Dry meat with paper towels. 
Step 3: coat meat in flour and pepper (add salt after its browned) The flour helps it stay dry to brown and also helps to thicken your sauce after.
Step 4: brown meat on med-high heat. Allow a separation of the meat and do not crowd so that meat will brown. I have the pan almost too full but, it did brown perfectly in then end. If you put too much meat in the pan it will steam and never fry to get brown. It may be necessary to do this in a few batches.  Remove meat from pan and set aside when done.
Step 5: turn down heat to medium and add onions. Scrape off the crunchy fond on the bottom of the pan. That is all flavour and your future sauce. Cook 3-4 minutes until just starting to brown.
Step 6: add a small amount of beer and scrape off all remaining bits on the bottom of pan. Then add remaining beer. 
Step 7: add garlic, chopped chilies, chili flakes, Italian seasoning, paprika, salt and porchini powder (I just take dried porchinis and make them into dust in a coffee grinder) Cook covered 1 hour on medium-low. Stir from time to time and add more water if it gets too dry (or you could also add more beer)
Step 8: after 1 hour add grated apple, sliced mushrooms and chopped sweet potato (you could also use a regular potato if you prefer. Cook for another 1/2 hour on a med/ low gentle simmer. Just let it blip away.
Step 9: After 1 1/2 hours of cooking mix 1 tbsp of butter with 1 tbsp flour and stir. Stir into your stew. Cook another 5 minutes. Taste it. Add salt and pepper if needed.
Step 10: top with parsley and serve in big bowls with crusty bread and an ice cold beer.

Bulgur Wheat Salad – two ways

Bulgur is Toasted Cracked Wheat. It makes a crunchy salad and stores well in the fridge for a few days. I have made two salads with simple ingredients.
You will Need:

Salad #1

  • 1 cup bulgur wheat
  • 1 cup boiling water
  • 1/2 lemon zested, then juiced
  • 1 clove garlic- crushed or chopped fine
  • 1/2 cup chopped parsley
  • 3-4 tbsp olive oil
  • 1 tbsp fresh red chili -chopped fine
  • 2 stalks celery- chopped fine
Salad #2
  • all above ingredients plus
  • 1/2 apple sliced thin-skin on
  • 2 tbsp apple cider vinegar
  • 1/4 dried cranberries- chopped fine
Step 1: in a small bowl add dry bulgur wheat and boiling water. Stir and cover with plastic wrap and let sit for 30 minutes.
Step 2: After 30 minutes the water will all be absorbed into the wheat. Add the wheat to a larger bowl.
Step 3: zest then juice the lemon into the bowl. Chop parsley, garlic, red chili and celery. Add them to the bowl. Add olive oil  and taste. If you need more olive oil or lemon add some. 
I served this salad on Bibb lettuce with a drizzle of really good olive oil and salt and pepper.
Salad #2 The second salad adds a few more ingredients. Some slices of apple, some chopped dried cranberries and some cider vinegar. The cider vinegar along with the lemon is really nice because it’s sweet and tart.
Finish with a drizzle of good olive oil, salt and pepper.
It stores well in the fridge for a few days. When serving it after being in the fridge you can refresh the salad by adding a bit more lemon or/and a bit more oil.

Pearl Couscous and Red Pepper Salad

When I am busy gardening or outside playing all day this is the kind of thing I love for a quick dinner.  Pearl Couscous or Israeli Couscous is a round pasta that you would cook just like any other pasta. I like to cook it Al Dente which means there is still a bit of tooth to it. I have also shredded some red pepper and added  fresh mozzarella cubes (more like rectangles!) and it is served on some soft Bibb lettuce.

You will Need:

  • 1 cup pearl couscous 
  • 1 clove garlic- crushed/chopped fine
  • 1/2 red pepper -grated on a box grater
  • 1 tbsp fresh red chili chopped finely (any kind you like mine is medium heat)
  • olive oil
  • 1/2 lime – juiced
  • 1/2 cup fresh mozzarella or bocconcini -chopped in cubes
  • 1 tbsp cilantro/parsley- finely chopped
  • salt and pepper
  •  Bibb lettuce (or any other soft leaf lettuce)
Step 1: in a large saucepan add 3 cups water (you can also use chicken or vegetable broth) Boil water and add enough salt to make the water taste like the sea. Add couscous and boil for 10 -12 minutes until cooked. It should still have a bit of chew to the centre when cooked. I find Israeli couscous in my health food store but, you can find it in better grocery stores. (we ain’t there just yet in my area!)
Step 2: once cooked strain and let cool slightly in a medium sized bowl. Add a few tbsp of olive oil to coat and separate the pasta.
Step 3: add all your ingredients. I like to grate the sweet red pepper on a box grater and if I do it flat I can  grate the soft inside flesh and throw away the skin. Chop chili pepper, garlic and cilantro/parsley finely. Juice lime and add more oil if too dry. Chop fresh mozzarella and add salt and pepper. Taste it. If you need to add more lime, add it. (some limes are more dry than others. Just like people!)
Serve on top of some Bibb lettuce and you have a great dinner. 
This little unassuming pasta salad is surprisingly filling and satisfying.

Coconut Banana Cream Pie with Rum Cream

This pie is decadent!
It’s coconut custard with a bottom layer of caramelized bananas and just a breath of chocolate on the crust. Then it is all topped off with rum whipped cream and toasted coconut.
There are lots of steps but you can make the pie one day and them top and serve the following. 
You will Need:
Crust
  • 1 1/3 cups graham cracker crumbs
  • 1/4 cup shredded coconut
  • 6 tbsp butter- melted
  • 1 1/2 tbsp granulated sugar
Chocolate Layer
  • 1/3 cup melted chocolate
Banana Layer
  • 2 tbsp unsalted butter
  • 2 sliced bananas
  • 2 tbsp rum (I used my homemade rum infused with vanilla beans- see other post on how to make)
  • 1/3 cup dark brown sugar
Coconut Filling
  • 1/2 cup sugar
  • 2 1/2 tbsp cornstarch
  • 1 tbsp minute tapioca
  • pinch salt
  • 1 can coconut milk
  • 3 egg yolks (save and freeze the whites!)
  • 1 tbsp butter
  • 1/2 tsp coconut extract
  • 1 tsp vanilla extract
  • 1 cup shredded coconut (any kind you like)
Rum Whipped Cream
  • 1 cup whipping cream (this is the smallest sized container)
  • 2 tbsp vanilla sugar
  • 1 tbsp rum
  • 1 tbsp powdered milk (this will stabilize the whipped cream- you don’t have to use it if you plan on eating the pie right away but it is helpful if you want pie to keep a day or two after)
* you also need a removable bottom tart pan or a glass pie plate.
Step 1: I like to line a removable tart pan with parchment paper. I just fold over the extra paper and place back in the tin. You do not need to do this however, it allows you to easily slide the entire pie off of the bottom once its chilled and ready to serve. I can then put it on a serving platter and not worry about cutting the slices on my pan.
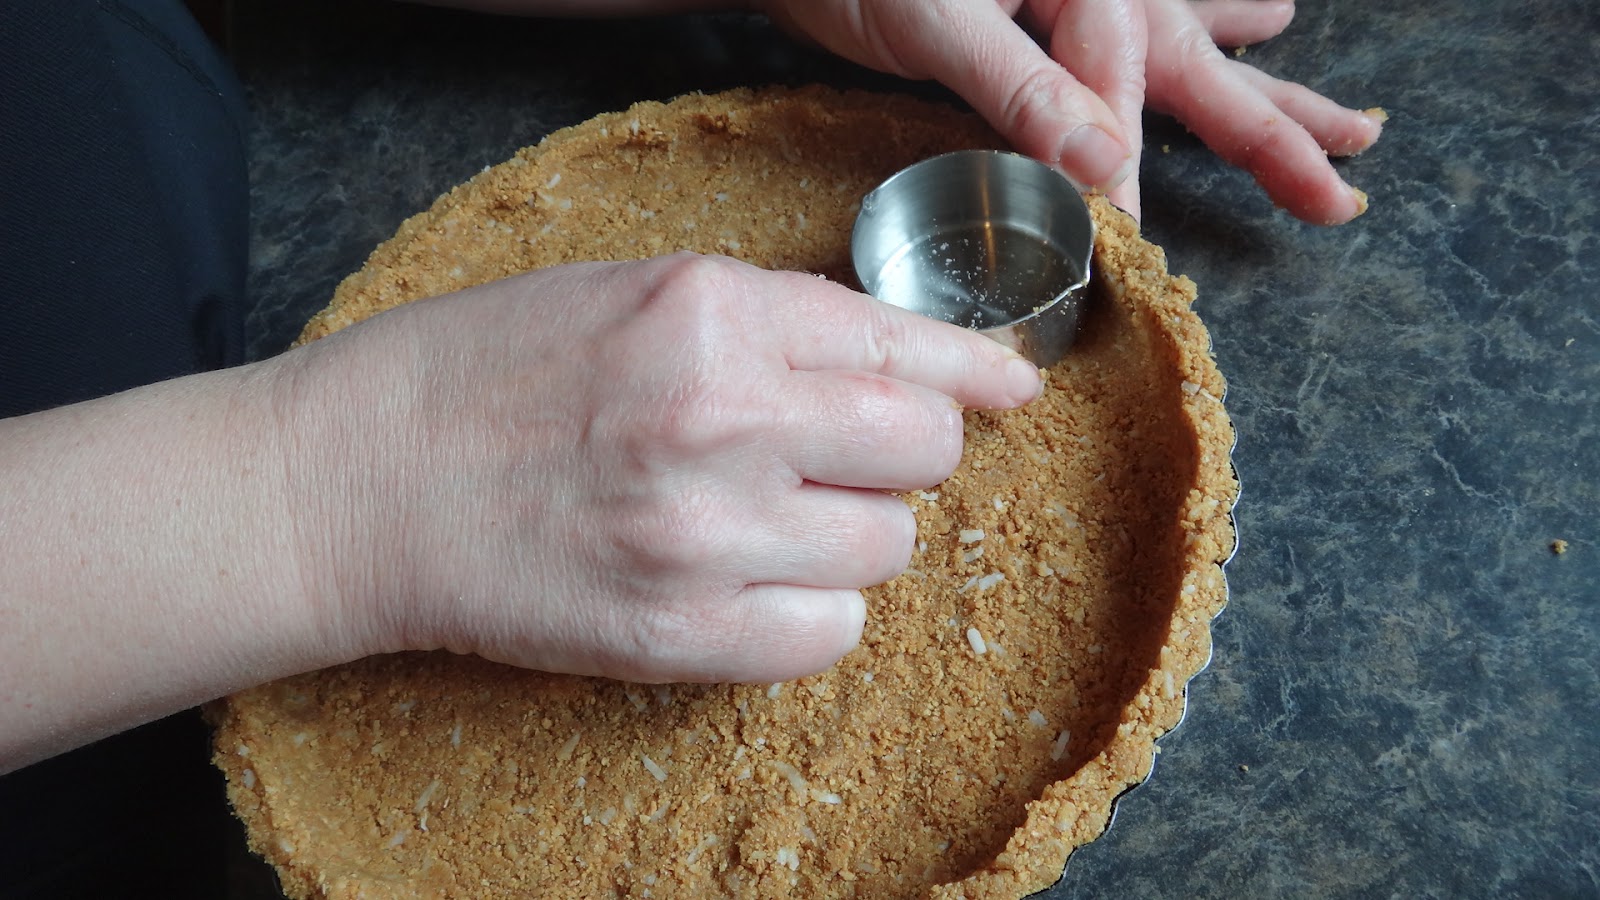
Step 2: prepare crust in a medium bowl. Add graham cracker crumbs, shredded coconut, melted butter and sugar. Mix until resembles wet sand.
Step 3: press into pan using a measuring cup -this makes a nice smooth even crust.
Step 4: Carefully lift pie by the sides of the pan (or the crust will fall out!) and put onto a cookie sheet. Bake at 350 degrees F for 8 minutes until the butter melts and the crust sets. Remove and set aside.
Step 5: melt any good quality chopped dark chocolate in a small bowl which will entirely cover a pot of simmering water. Do not let any water get into the chocolate or it will seize up and not get liquid. You can also melt chocolate in a microwave safe bowl in 20 second increments. I stir after each 20 seconds until liquid. This amount takes about 3or4  20 second increments in the microwave to melt completely. This method avoids cooking it too quickly in the microwave and burning.
Step 6: pour liquid on crust and use a small spatula to spread it evenly. It should be a very small amount to just barely taste at the bottom of the pie. Once it cools it will harden. This layer also prevents the crust from getting soggy once the bananas are put on.
Step 7: prepare the banana layer. Slice bananas (not too ripe) and measure ingredients. In a saute pan melt butter and brown sugar until sugar has dissolved. Add rum and bananas. Toss to coat and remove from heat.
Step 8: pour evenly over the chocolate layer on crust. Tilt pan to allow the liquid to evenly coat into the corners.
Step 9: prepare coconut custard filling. In a heavy pot add sugar. cornstarch, minute tapioca, salt. Turn on heat to medium and add coconut milk, egg yolks. Stir constantly until the mixture comes to a gentle boil. Once it boils it will thicken. This may take 4-5 minutes do not walk away and leave it. Once it boils cook 30 seconds and remove from heat. Add butter, shredded coconut, vanilla and coconut extracts.
Step 10: pour on to crust and spread evenly. Place a piece of plastic wrap directly on top of hot custard and let cool to room temperature. Cool completely in fridge at least 5 hours -or you can leave it to serve the following day.
Step 11: once the pie has cooled. Lift removable bottom from sides and unfold the parchment paper. Carefully loosen bottom from paper with a spatula knife and slide onto serving platter.
Step 12: whip cream with sugar(I used my homemade vanilla sugar), powdered milk and rum until stiff enough to make a peak. The dry milk will stabilize the cream. 
Step 13: toast a few tbsp coconut in a pan on stove (watch it- it will burn!) If you have a fresh coconut this is the place the make some nice curls with a peeler and toast.
Slather on the cream, top with the toasted coconut and serve.
One bite lets you know it was worth every bit of effort!

Chili Lime Chicken Pasta

The flavours of Chili and Lime go so well together and this is a great recipe if you have leftover cooked chicken or if you are thinking of what you can make with those chicken breasts you bought. 

You will need:

  • 2 cups cooked chicken chopped or 2 breasts chopped
  • 2 cups small bow tie pasta- measured uncooked
  • 1/2- 1 cup starchy pasta water (just before straining pasta)
  • 1 red chili
  • 2 cloves garlic- crushed
  • 1 sweet red pepper half sliced  into strips and 1/2 pepper grated on box grater
  • 1 tomato -chopped fine or grated on box grater
  • 2-4 tbsp olive oil
  • 1 tbsp red wine vinegar
  • 1 tsp dried oregano
  • 1 tsp ground cumin
  • 1/2 tsp pepper
  • 1/4 tsp salt (more to taste)
  • 1 tsp chili powder
  • 1/2 tsp cayenne pepper
  • 1 tsp lime zest
  • 1 lime juiced
  • 2 tbsp fresh cilantro
Step 1: prep all ingredients. Chop chicken (fresh or cooked) slice chili, sweet pepper, chop cilantro and crush garlic.
Step 2: in large pot boil water and once boiling add 1 tbsp salt and pasta. Cook to directions on package to al dente (which means “to the tooth or a bit hard)
Step 3: In a large saute pan add olive oil, chicken and spices. Add  oregano, cumin, chili powder and  cayenne. If you find the pan getting dry add bit more oil as necessary.
Step 4: add sweet pepper and tomato can be chopped or I like to cut a tomato in half and grate it into the pan leaving the skin to discard. I do this with 1/2 the sweet pepper as well. It makes a bit of a simple sauce.
Step 5: add remaining ingredients. vinegar, lime juice and bit of zest. Cook 1 minute.
Step 6: add pasta and 1/2 cup of starchy pasta water.Do not underestimate the power of the pasta water to finish pasta and make it smooth and silky.  Toss and combine, if too dry add a bit more water. Finish off heat with chopped cilantro. Taste and add more salt and pepper if necessary.
Step 7: serve with a drizzle of good olive oil.
I like to serve with some toasted bread rubbed once with a raw clove of garlic and a bit of good olive oil and sea salt or you can take a chunk of tomato and squish it on the the bead as well. 
The Tuscans call this kind bread Fettunta which means oily bread.

Quick Caesar Salad

Everyone loves a Caesar salad. Big Pete loves this salad!
 I find there are two types of Caesar salad. The gooey, creamy, thick Caesar that most people buy in a jar and the kind you get in a restaurant that makes it from scratch. They mix it in front of you and toss it just before serving.  I like the large pieces of romaine and the  thinner vinaigrette type Caesar with big curls of fresh Parmesano Reggiano and fresh cracked pepper.
This is that kind of Caesar salad in taste but, a cheater version you make in a jar.
You will need:
  • a little glass jar with a lid 
  • 1 head romaine lettuce
  • 1 clove garlic – crushed
  • 1 inch anchovy paste
  • 1 tsp Dijon mustard
  • 3 shakes Worcestershire sauce
  • 4 tbsp olive oil
  • salt/pepper
  • 1/2 lemon juiced
  • chunk of Parmesano Reggiano- shaved or grated
*optional add garlic croutons or a slice of grilled chicken to make it a full meal.

Step 1: wash and dry the romaine lettuce. I prefer using only the tender inner leaves and I don’t use the dark green parts of the lettuce. I also like to leave the pieces in large pieces. It is very important to dry the lettuce so if you have a salad spinner this is the time to get it out. You can buy them at housewares stores or even dollar stores.
Step 2: in a jar add all ingredients and shake for a full minute to emulsify well. You can buy anchovy paste in all grocery stores (sometimes it is in the refrigerated section). Use real Parmesano Reggiano it makes a difference and always use fresh lemon juice.
Step 3: just before serving pour a small amount of dressing on the leaves and toss gently in a large bowl with your hands to get the dressing on all leaves. Plate the salad with shavings of Parmesan (I used a potato peeler ) and a grinding of fresh cracked pepper. You can store the remaining dressing in the fridge.
The lettuce is so fresh and crunchy and the dressing is tart and velvety with the salty finish of  the curls of Parmesan. 
You will never look at the stuff in a jar the same again.

Blue Cheese Meatloaf

Beef and Blue Cheese is a great combination so why not in a meatloaf? These make an easy alternative to grilling a burger outside. I liked it when I am pressed for prep time. I make the meatloaf in the morning, leave it in the fridge until I am ready. I bake it and serve it like a moist burger on squishy buns or I serve it with roasted vegetables.

You will need:

  • 1 pound ground beef (mine is regular ground)
  • 3 tbsp blue cheese 
  • 1 egg
  • 2 cloves garlic crushed
  • 1 tbsp olive oil
  • 1 tbsp lemon juice
  • 2 tbsp dijon mustard
  • 1 tbsp bar-b-q-sauce
  • 1 tbsp ketchup
  •  1 tsp each salt/pepper
  • more bar-b-q sauce and ketchup for top of meatloaf
Heat oven to 375 degrees F

Step 1: add beef, blue cheese and garlic to a medium bowl.

Step 2: add egg, mustard, olive oil, lemon juice, mustard, bar-b-q sauce, ketchup and salt and pepper.
Step 3: with your hands mix everything well making sure blue cheese is crumbled. Then pat into a loaf pan making sure meat is away from the sides. When you bake meatloaf there is always lots of water and fat that will be rendered. I like to drain this liquid at the midway point if I am cooking it in a loaf pan. If you prefer you can form the loaf and place it on a rack while baking so the liquid drips away from the meat. I find that too many things to wash so I just drain it and cook it this way.
Step 4: Bake at 375 degrees F for 30 minutes
Step 5: take a spatula like you would use for flipping pancakes and hold the meat while you pour out the liquid along one side of the pan.
Step 6: pour on some ketchup and bar-b-q sauce (or all ketchup if you prefer) and bake another 20 minutes until done. Let it rest for 5 minutes before slicing and serving.
Serve with big slices of tomatoes on a squishy bun! Like a nice juicy burger.

Roast Chicken Dinner


Everyone needs to know how to make a good  Roast Chicken and there are a million ways to cook one.

This is just one way! I like to start with the best quality chicken you can find. A  natural or Organic chicken is best and if you can get it fresh (not frozen) even better. I like to cook it in a very hot oven with lots of salt and pepper on the skin and a few flavourings inside. Toss in some vegetables and there you go!

Awesome Chicken Dinner!

You will need:

  • a nice little chicken
  • olive oil or butter
  • course salt and fresh ground pepper
  • granulated garlic ( not garlic salt )
  • 1/2 lemon
  • fresh thyme sprigs
  • 1 tbsp Zaatar or Italian Seasoning
  • 1 head of garlic
  • 2-3 carrots
  • 1-2 potatoes
  • cauliflower 
Heat oven to 450 degrees F. That’s a hot oven!
Step 1: wash chicken inside and out with cold water. Dry with paper towels and leave in fridge uncovered for a few hours to let skin dry out. This helps to make a crispy skin. Put salt and pepper on inside and fill with 1/2 lemon, some garlic cloves and thyme sprigs.
Step 2: rub butter or olive oil on skin. Sprinkle with lots of salt and pepper. 
Step 3: roast for 15 minutes.
Step 4: peel and cut your favorite vegetables, add remaining cloves of unpeeled garlic.Toss in olive oil, salt, pepper and a bit of Zaatar or Italian Seasoning.
Step 5: add vegetables to the pan with the chicken you have cooked for 15 minutes.
Step 6: Turn down heat to 425 degrees F and continue to cook for 45 minutes to 1 hour. I test the chicken’s doneness by poking in a knife at the joint where the leg is attached and juices should run clear or I stick a wooden spoon in the cavity and tilt to to see if the juices run clear. The top should be nicely browned.
Step 7: Put chicken on a cutting board and cover with foil letting it rest for 15-20 minutes.
Step 8: remove vegetables and if the potatoes are not crispy enough for you – you can always put them in a saute pan and continue to fry for a few minutes to get crunchy.
Step 9: strain juices and pour off fat that will sit on the top. I use this as a simple jus or thin gravy. 
Dig in!

Nut and Seed Snack Bars

You don’t have to buy Nut and Seed Bars! They are simple to make and you can let your imagination run wild. Pick any combinations of fruit and nuts and seeds you like. No preservatives and it’s cheaper than buying individual bars.

This recipe is for Shelley and Sandra who used to ask me to make them and bring them to work.

You will need:

seeds, nuts, sticky stuff like dried fruit, honey, agave, juice.

  • 1 cup mixed trail mix- mine had all kinds of nuts, seeds and raisins
  • 1/4 cup dried apricots
  • 1/4 cup dried orange cranberries
  • 1/4 cup orange juice
  • 1/4 cup cashews
  • 1/4 cup honey
  • 1 tbsp ground flax
  • 1/4 cup sesame seeds
  • 1/4 cup pumpkin seeds
  • 1/2 tsp ground cinnamon
  • pinch salt
  • 1 tsp vanilla
  • food processor
Step 1: In processor grind apricots and cranberries until they are in tiny bits. Soak in orange juice 5 minutes.
Step 2: Process trail mix, dates, cashews, soaked cranberries, apricots and orange juice, honey, flax, cinnamon, salt and vanilla. I like it fine so that the moisture helps to glue the bar together.
Step 3: In a bowl add contents of processor and fold in pumpkin seeds and sesame seeds to combine.
Step 4: Spray a small square pan lined with foil. I used an 8×8 pan with olive oil spray. If you like a thicker bar use a smaller pan and cut into smaller squares.
Step 5: Press and smooth top and corners with a spatula or wet fingers. 
Step 6: Bake 325 degrees F 15 minutes.
Cool completely.
Step 7: with a large oiled knife slice into 10 bars. They are pretty delicate and chewy. Remember they just have some honey and juice along with the sticky fruit holding them together. You can also increase the amount of dates to get a more glued bar. Wrap in plastic.
When you feel hungry in mid morning or 3pm this is a good alternative. You know what’s in it because you made it.